Workflow, permissions and the Add-in Web
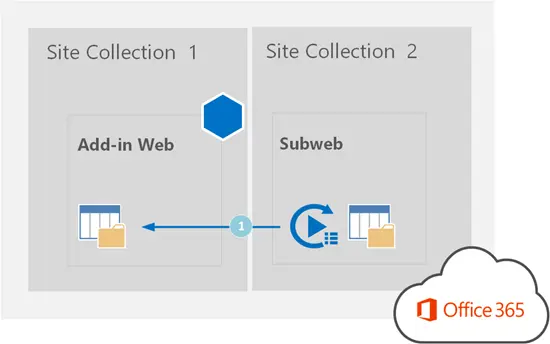
Workflow is a pretty awesome feature of SharePoint, but combining them with the Add-in web (formerly known as app web) is even better! Let assume you either have a provider hosted add-in or a SharePoint hosted add-in. You then will most likely also have an add-in web. You can use the add-in web to store lists and libraries to hold information. In our case we have a scenario where we store both some configuration for one of our add-ins. In a specific case we also wanted to add entries to a list based on a workflow. The interesting part there was the fact that it was over two different site collections.
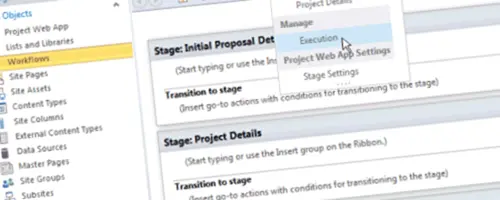
Setting up your workflow
When working with a workflow you can use the REST options to add entries to another list. Adding items through REST is pretty straight forward and there has been a number of blogs about it. MSDN has an article called Working with Web Services in SharePoint 2013 Workflows using SharePoint Designer 2013 another easy start could be: Using SharePoint REST services from workflow with POST method.
The first step will be to create a new dictionary in your workflow and call it RequestHeader. Add two key value pairs to this dictionary:
- Accept with value application/json;odata=verbose
- Content-Type with value application/json;odata=verbose
Create a new another Dictionary and call it Metadata, add one key value pair with type and set the value to SP.Data.ListNameListItem. You can find the value for SP.Data.ListNameListItem by executing a query against: https://<site>/_api/web/lists/getbytitle(‘<List Name>’)?$select=ListItemEntityTypeFullName.
After that you can create values for every entry you want to fill in the list item you want to create. Finally create a new another Dictionary and call it RequestData, add one key value pair with __metadata and set the value to Metadata variable you just created. Then add the values for the list item you want to create.
Permissions for your workflow
Once the workflow is created and published you can assign permissions. Without assigning the permissions the workflow will run however all the REST calls you execute will fail with an Access Denied.
Pro tip: log the results of your REST requests to the workflow history to quickly identify problems.
Go to the site collection the workflow is running on and go to gear icon – site settings– site app permissions. In this app permissions window you can see a workflow entry. Locate that workflow entry, and copy paste the first GUID after |
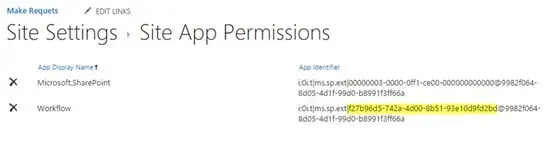
You can then browse to the add-in web and add the following URL: {addinweburl}/\_layouts/15/oauthauthorize.aspx?client\_id=f27b96d5-742a-4d00-8b51-93e10d9fd2bd&response_type=code&scope=Site.Manage
By doing so you workflow will be granted Site.Manage permissions to execute any action against the Add-in Web. There are four levels of permissions you can use:
- Read
- Write
- Manage
- FullControl
And you can use those four permission levels on the three objects:
- Web
- Site
- List
The list version will redirect you to a page where you can select the list you require permissions on. So you van setup a least minimal permission scope if that allows you to only manage a specific list if you are required to! The last permission level that you can use is the Search.QueryAsUserIgnoteAppPrincipal that allows you to run search queries from REST against a specific endpoint. This can be extremely helpful if you are required to search for content regardless of the location. Keep in mind though that if you are required to open or edit the file you might need permissions on that location as well.
Using REST calls from your workflow thus is a pretty awesome option, even in combination with existing add-ins as you can now write to the add-in web!