· 4 min read
Setup Azure Sql with Azure VPN
There are a lot of advantages of Azure, and for me one of them is the ease of creating new stuff. Need something running? It is just a few clicks away. So, when a customer asked if we could provide them with some SQL power all it took was a bunch of clicks to setup according to their requirements. Now I am not an infrastructure specialist, but I wanted to make sure everything is safe. The data that is going to be stored contains some confidentiality so I figured a VPN solution would be safe. Most of this stuff is documented well, but a few quirks made me do a quick write up in this blog.
Azure VPN Gateway
The Azure VPN Gateway is the first thing we need. It allows you to connect from an on-premises network to Azure either through Site-to-Site (your whole office) or Point-to-Site (just your machine). So for the sake of demo let us say we need a Point-to-Site VPN. It will connect our machine we are working on to Azure, making sure we can connect to our new SQL machine. There is a great article on how to configure a Point-to-Site VPN connection using Azure certificate authentication: Azure portal. Just be sure that when you are using PowerShell to generate the certificates you need to connect to the right subscription.
Once you have followed along with the article you should have all you need. There are no requirements from a SQL perspective around IP ranges so feel free to use whatever you require if there is one free IP address you can use for the SQL environment. Also make sure to pick the right SKU for your VPN connection. If you want to use certificates it is worth picking Standard over Basic as Basic might not support all your needs. And as it takes 45 minutes to provision everything it will bug you if you have to upgrade or start over.
Azure SQL
With a working VPN configuration all that is left is to configure your SQL environment. I did use a single SQL database on a SQL server running serverless. To get everything running and disable connectivity you need to configure four things.
- Firewall rules to block public access
- Connect your SQL environment to a Virtual Network
- A private endpoint to connect from withing a Virtual network
- Local machine settings to translate an IP to a Private Endpoint
Firewall rules & Virtual network settings
The first step is the easiest one. Configure your Firewall rules to block all public network access. By doing so no one can connect to your SQL server.

Keep in mind that as long as this is turned on you cannot get to your SQL environment (so it is both safe as unusable). Once the checkbox is selected it points out that you should create a Private endpoint. But before doing that we need to Add existing virtual network.

Clicking that option will allows us to create a new Virtual Network Rule. By selecting the same Virtual Network our VPN connection is in, and putting it in the correct Subnet we can connect to it whenever we are on the same internal network. This step is not required but helps when we are connecting from within the same network (Azure VM’s in the same Virtual Network). Next up, we are ready to create our Private endpoint.
Private endpoint
A Private endpoint connections allow connections from within a Virtual Network to a private IP. Creating a connections using a private endpoints thus allows access to all databases in our SQL server. Creating a new Private Endpoint will require some input. Most of the settings are straightforward; pick the correct Resource Groups etc. Important is to notice the Link type: Microsoft.Sql/servers and to go through the different settings. Your settings will look something as in the following screenshot:
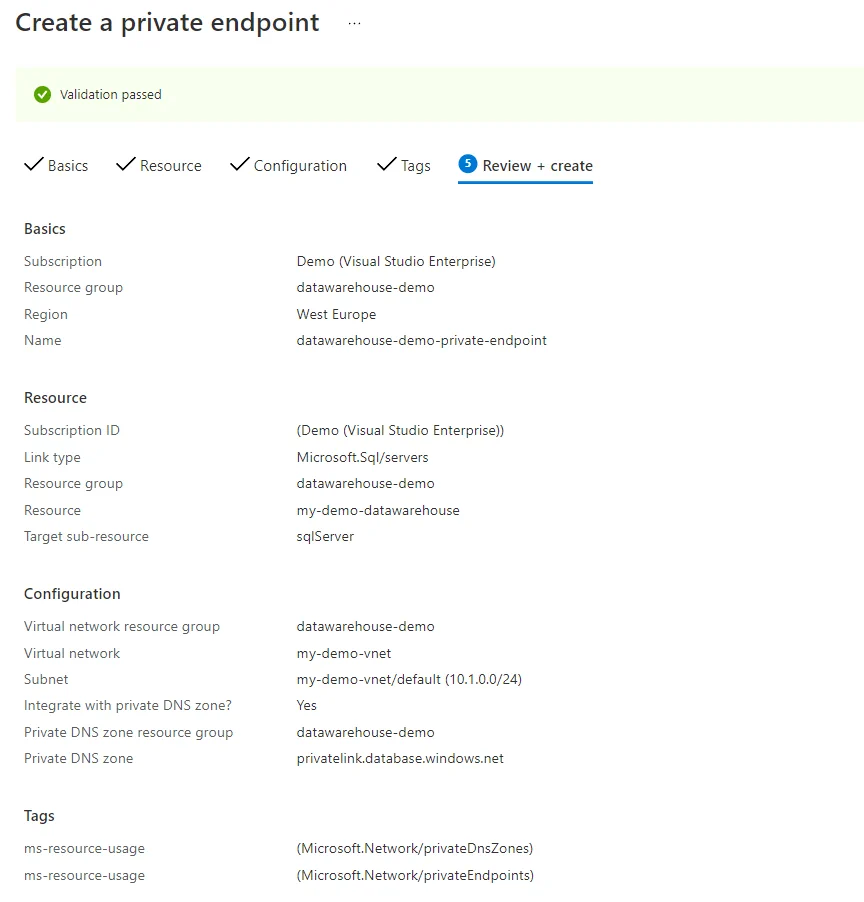
Provisioning might take a few minutes, but once it is done your Private Endpoint can be used. Make sure to navigate to the Endpoint and checkout the DNS configuration. Note down the IP address that is linked as we will need it in our next step.

Local settings
The final step to be able to connect to SQL with a VPN connection is to edit your host file. Run notepad as administrator and open your Host file to add a new line:
10.1.0.5 my-demo-datawarehouse.privatelink.database.windows.net
The IP address is what we have captured when checking the DNS configuration of your Private Endpoint. The Domain that we link through is your SQL server name: my-demo-datawarehouse.database.windows.net but instead of the database.windows.net we added privatelink in between as that is the URL that gets generated when we created our Private Endpoint. With those settings in place in our host file we can now connect to our SQL server only if VPN is on our machine. Making sure your SQL data has an additional layer of security in place 🔒.

Albert-Jan Schot
CTO, Microsoft MVP & FastTrack Recognized Solution Architect
I am Albert-Jan Schot, CTO at Blis Digital, Microsoft MVP, and FastTrack Recognized Solution Architect focused on Microsoft 365, Azure, and AI agents. I help teams turn complex Microsoft Cloud challenges into practical architecture decisions and shipped outcomes.
Zuid Holland, Netherlands