· 5 min read
Running the CLI for Microsoft 365 in an Azure Container Instance
I must admit that I am not knowledgeable on anything around containers. So I was very happy that we released a Docker image for the CLI for Microsoft 365. It sounded like a great excuse to start playing around with it. Running the image locally turned out to be straight forward. However, running the image as an Azure Container Instance turned out to be a bit challenging. I figured that the goal should be to run the CLI as an Azure Container Instance orchestrated by a Logic App (or Flow in Power Automate). That way I could run scripts or reports against my tenant. This blogpost describes how to get started and some of the remarks.
Setting up a Logic App
Setting up a logic app is something I had done before. So I took a blogpost on sentiment analyses with containers. The steps similar so they are a great way to get familiar with the technology. For demo purposes I created a Logic App with Http Trigger, set some variables (not required but make testing a bit easier), and used the create or update container group to setup the basics. When setting up the container we can load the CLI for Microsoft 365 container by using the m365pnp/cli-microsoft365:latest command. Now the goal was to setup the container and to automatically execute a few commands. Unfortunately, you cannot chain commands and can only setup a single start up command.
Managed Identity
So instead of using a single command we setup a start-up script and use Managed Identity to make sure we do not have to store credentials. The script will execute all our commands, the Managed Identity makes sure we do so in a secure way. Simply create a user managed identity and within the Create Container action selected the Add new parameter to add both the ContainerGroup Managed Identity Type and ContainerGroup Managed Identity User. In the User property add a snippet of JSON. Make sure to use the following snippet instead of the sample from the description. It took me an hour to figure out the correct syntax 🤐.
{
  "/subscriptions/{guid}/resourcegroups/{resourcegroupname}/providers/microsoft.managedidentity/userassignedidentities/{identity-name}": {}
}
Using a snippet like this will ensure that the Azure Container Instance is created with the specified managed identity. In my case I provided the managed identity with the correct permissions. I simply used the CLI itself to grant permissions:
m365 aad approleassignment add --displayName "dgw-ma-cli-test" --resource "Microsoft Graph" --scope "Sites.Read.All"
m365 aad approleassignment add --displayName "dgw-ma-cli-test" --resource "Office 365 SharePoint Online" --scope "Sites.Manage.All"
You can also use the Managed Identity to create the Container Instances if the managed identity has permissions on your Azure resources. This is not required but can be helpful if you do not want to connect with your own credentials.
Startup script
Once the permissions are in place you can execute a script itself. I choose to use a public GitHub repo. But you can pick a private one, or an Azure Blob. Again, it took me some time to figure out the correct settings, but that has most likely to do with my limited knowledge of Linux. Loading in a script and executing it are three steps:
- Add parameters for the repo and specify the Volume Directory to be a
., and the repository a link to the repo as follows:https://github.com/reponame/somerepo.gitand Volumename asgitrepo - Add a Container Volume Mount parameter with the
/mnt/repo1path and Container Volume Name asgitrepo. The name must match the Volumename from step ` - Add two Container Command Segments, the first one with the value
bash, the second one withmnt/repo1/test.sh. Make sure that thetest.shfile exists in the github repo.
That will make sure the script is pulled from a GitHub repo, and the scrip gets executed. The script itself can contain anything you like, just add a login statement with the --userName. The value of that must be the ID of the managed identity you have created (a GUID). By doing so you get signed in (if the managed identity has been set properly) without having to provide additional details.
m365 login --authType identity --userName {guid}
m365 spo site classic list --output json
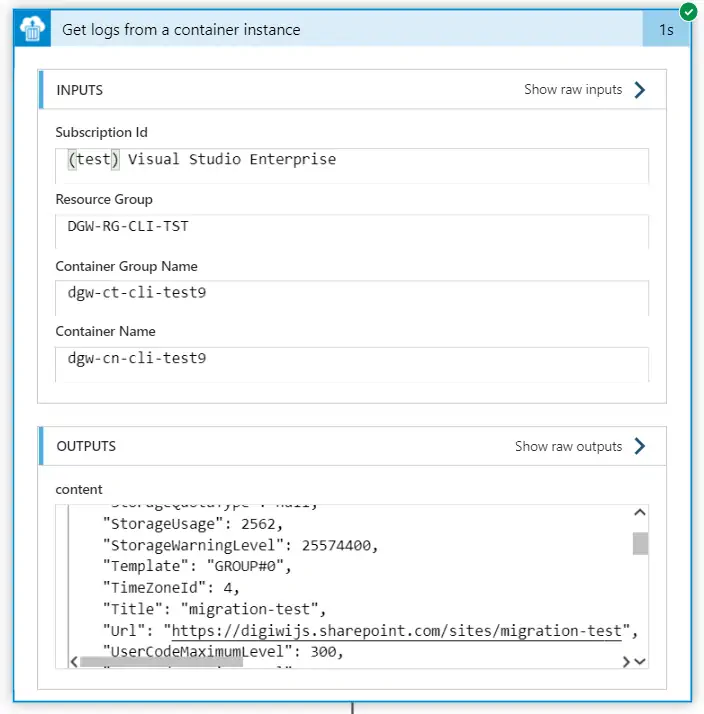
The result of the script can be captured using a Get logs from the container instance action. As we specified the --output json in our script we can even process it further withing the Logic App if you want
Remarks
A minor remark is that not all CLI for Microsoft 365 will run as a managed identity. Some will fail due to API’s not supporting the App Only scenario. You cannot for instance update a SharePoint User Profile with this scenario, but most of the commands will work as expected. While it took a while to figure out how to setup all the components once it is in place you can easily change or extend the script. In my current setup I use some of our sample scripts to report results of sites on my tenant. The awesome thing is, I can now setup an easy schedule get the script in place and with almost no code I can configure the next steps or way I display the report.
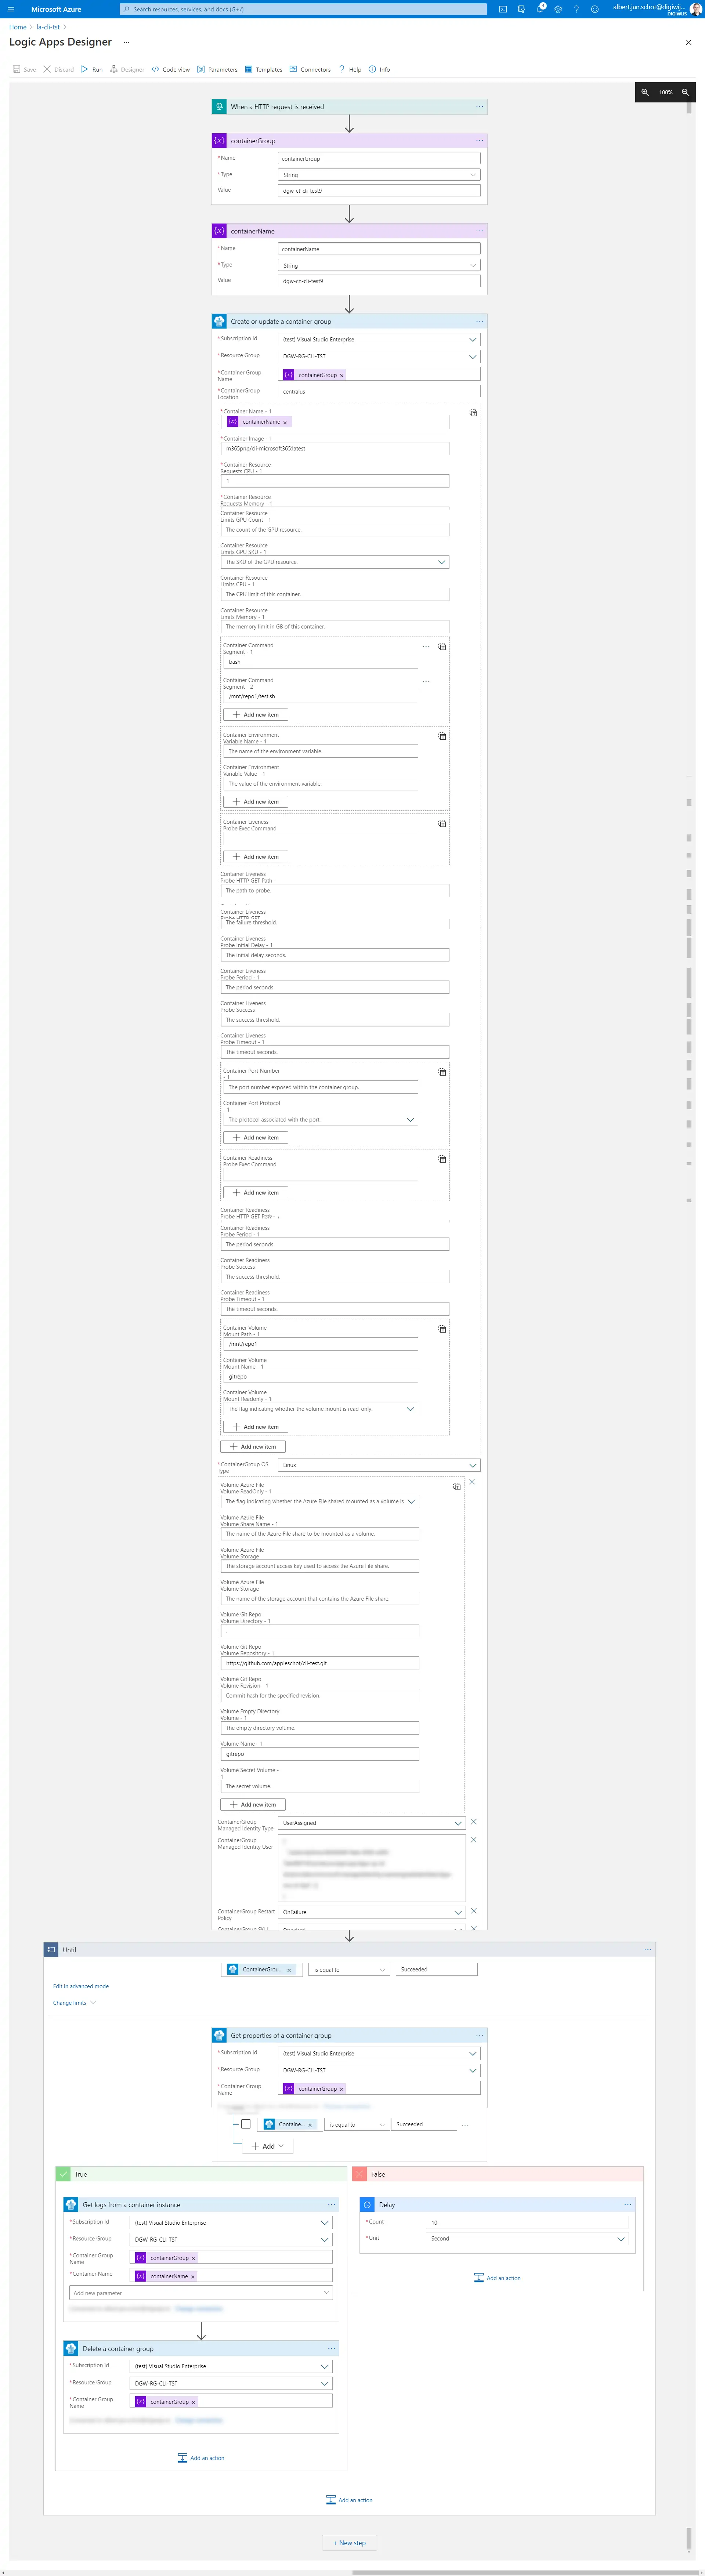
Full setup
A screen capture of the full setup:

Albert-Jan Schot
CTO, Microsoft MVP & FastTrack Recognized Solution Architect
I am Albert-Jan Schot, CTO at Blis Digital, Microsoft MVP, and FastTrack Recognized Solution Architect focused on Microsoft 365, Azure, and AI agents. I help teams turn complex Microsoft Cloud challenges into practical architecture decisions and shipped outcomes.
Zuid Holland, Netherlands